Lesson 4
by Mary Ann Boysen
A painting should never be cut in half by the horizon, nor should it be cut in half by a stron vertical line or a diagonal line. Alway position your horizon above or below center. The further it is from the center, the more dramatic the overall effect.
If the sky is to be the important part of the painting, put the horizon low on the page, which will draw more attention to the sky. If the landscape is to be more important, then place the horizon high on the page, so the sky doesn't compete with it.
|
|
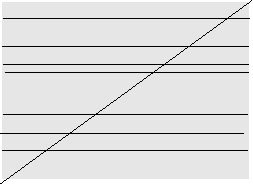
Take a look at the diagram below. Each place that has a horizontal line (representing the horizon) by the diagonal, could be the focal point of the painting. This is called the Eye of the Rectangle. These are not absolutes, but only suggestions.
For fun, let's begin with a simple sky wash. We will add some trees for interest. Using 140# good watercolor paper (any that were mentioned earlier)...begin by putting some of the sky color on the work surface of your palette.
Dip your brush in water and grab some of the warm color from your palette. I suggest some Quinacridone Gold, Yellow Ochre, or Raw Sienna..(only one of these!), then grab some red or pink like Opera, Alizarin Crimson, or Cadmium Red, and put a puddle of this on your palette next to the warm color you chose. Then rinse your brush, and grab some Cobalt Blue, Cobalt Blue Deep, or Cobalt Blue Hue and place it in another spot on your palette.
Now dip your brush into each of the three colors and mix them into a nice gray in the center of the workspace. If the gray is too dull, add a little water to lighten it, or add more blue or red. Your sky can be a bright blue, but thisi is a lesson in mixing colors also.
Now we can begin painting.
1.Wet the paper with clear water, all the way to the bottom! Then dip your large brush (1" flat or larger) into the sky mixture.
2. Starting at the top of the page, swirl the sky mixture onto the paper, tilting the paper to allow it to bleed. Add more color if necessary and let the paint bleed all the way to the bottom of the page. Yes, the sky color is always reflected in the landscape.
3. Allow the paper to dry thoroughly. If you have wet the paper on both sides to begin with, the top surface will dry enough to paint the landscape without bleeding, but the underlying paper will remain damp and make the landscape part of the painting much easier.
4. Now choose your horizon. Using a pencil lightly, you can mark it for reference, but don't press down or you will put a dent in your paper.
5. With a clean wash brush, wet the sky above the horizon once again. While that area is drying enough to lose its shine, mix some browns and greens in a heavier texture (without much water) on your palette. The shine is caused by the amount of water on the page. As it soaks in, the shine will disappear.
6. It is at this time you can put color near the horizon, that will bleed upward slightly. If you have too much water in your landscape color, it will bleed uncontrollably into the sky. If it tends to bleed too quickly, tilt the paper so that gravity will keep it from covering the entire sky.
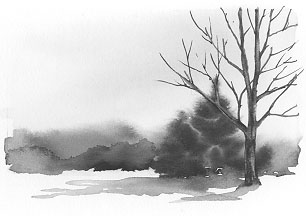
6. When you have mastered this technique and are satisfied with your background trees, allow the painting to dry a bit more before adding the foreground trees. Do not wet the area before adding the foreground trees, as the paper needs to be dry in order to get sharp, more defined edges.
See the illustration below:
In a future lesson, we can do more complicated landscapes. This is just a beginning. Do this several times to get accustomed to mixing colors and balancing pigments with the water.
<<Lesson 3: Stretching Watercolor Paper
Lesson 5: Dramatic skies>>
Return to Watercolor Lessons
Watercolor Painting Tips
See my 20 videos on YOUtUBE

|